Showing posts with label oracle 10g. Show all posts

Thursday, 21 June 2012

Linux Top Command Usege

top
The top command is probably the most useful one for an Oracle DBA managing a database on Linux. Say the system is slow and you want to find out who is  gobbling up all the CPU and/or memory. To display the top processes, you use the command top.

Note that unlike other commands, top does not produce an output and sits still. It refreshes the screen to display new information. So, if you just issue top and leave the screen up, the most current information is always up. To stop and exit to shell, you can press Control-C.

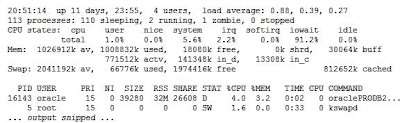
It's probably needless to say that the top utility comes in very handy for analyzing the performance of database servers. Here is a partial top output


Let's analyze the output carefully. The first thing you should notice is the "idle" column under CPU states; it's 0.0%—meaning, the CPU is completely occupied doing something. The question is, doing what? Move your attention to the column "system", just slightly left; it shows 5.6%. So the system itself is not doing much. Go even more left to the column marked "user", which shows 1.0%. Since user processes include Oracle as well, Oracle is not consuming the CPU cycles. So, what's eating up all the CPU?

The answer lies in the same line, just to the right under the column "iowait", which indicates 91.2%. This explains it all: the CPU is waiting for IO 91.2% of the time.

So why so much IO wait? The answer lies in the display. Note the PID of the highest consuming process: 16143. You can use the following query to determine what the process is doing:

select s.sid, s.username, s.program
from v$session s, v$process p
where spid = 16143
and p.addr = s.paddr
/
       SID USERNAME PROGRAM
------------------- -----------------------------
       159 SYS      rman@prolin2 (TNS V1-V3)

The rman process is taking up the IO waits related CPU cycles. This information helps you determine the next course of action.

Wednesday, 20 June 2012

Auditing In Oracle

There are two distinct type of auditing
Standard: Auditing based on statement, Privileges and object level.
Fine-grained: Auditing on a finer granule which is based on content i.e value > 10,000
The standard auditing having 3 levels of auditing:
Statement: Audit all action at any type of objects.
Privilege: audit action on system level privileges
Object_level: Specific audit action lie select, update, insert or delete.
For all the 3 level of auditing you can choose to audit by access (audit every time you access) or by session (audit only once per access during the session), you can also audit on if the access was successful (whenever successful) or not (whenever not successful)
DB: Enables database auditing and directs all audit records to the database audit trail, except for records that are always written to the operating system audit trail.
DB, extended: As per the DB value but also populate sqlbind and sqltext clob columns
OS: Enables database auditing and directs all audit records to an operating system file
NONE: Disables auditing (This value is the default.)
Note: You must bounce back the instance to activate audit parameter.

Setting Audit Trail:

SQL>alter system set audit_trail = db scope=spfile;
SQL>alter system set audit_file_dest = ‘c:\oracle\auditing’;
SQL>alter system set audit_trail = os scope=spfile;
Note: Note: if the audit_file_dest is not set then the default location is $oracle_home/rdbms/audit/
SQL>alter system set audit_sys_operations = true scope = spfile;
Note: this will audit all sys operations regardless ifaudit_ trail is set.
SQL>alter system set audit_trail = none scope=spfile;
Setup Audit Trail through Initialization Parameter
  1. Set "audit_trail = true" in the init.ora file.
  2. Run the $ORACLE_HOME/rdbms/admin/cataudit.sql script while connected as SYS

Audit Options

BY SESSION/BY ACCESS
BY SESSION causes Oracle to write a single record for all SQL statements of the same type issued in the same session. BY ACCESS causes Oracle to write one record for each access.
WHENEVER SUCCESSFUL/WHENEVER NOT SUCCESSFUL
WHENEVER SUCCESSFUL chooses auditing only for statements that succeed. WHENEVER NOT SUCCESSFUL chooses auditing only for statements that fail or result in errors.
Auditing Example:
Audit Session By Scott, Lori;
Audit Delete Any Table By Access Whenever Not Successful;
Audit Delete Any Table;
Audit Select Table, Insert Table, Delete Table, Execute Procedure By Access Whenever Not Successful;
Audit Delete On Scott.Emp;
Audit Select, Insert, Delete  On Jward.Dept By Access Whenever Successful;
Audit Select On Default Whenever Not Successful;
Audit Select Table By Appserve On Behalf Of Jackson;
Audit Alter, Index, Rename On Default By Session;
Audit Alter User;
Audit Lock Table By Access Whenever Successful;
Audit Delete On Scott.Emp By Access Whenever Successful;
Audit Delete Table, Update Table By Hr By Access;
Audit All By Hr By Access;
Audit Execute Procedure By Hr By Access;
Disabling Audit
Noaudit Table;
Noaudit All Privileges;
Turn Off All Auditing
Noaudit All;
Noaudit All Privileges;
Noaudit All On Default;
Purge Auditing
Delete From Sys.Aud$;
Truncate From Sys.Aud$
Delete From Sys.Aud$;
Delete From Sys.Aud$ Where Obj$Name='Emp';
View Audit Trail
The audit trail is stored in the SYS.AUD$ table. It's contents can be viewed directly or via the following views:
Dba_Audit_Exists, Dba_Audit_Object, Dba_Audit_Session, Dba_Audit_Statement, Dba_Audit_Trail, Dba_Obj_Audit_Opts, Dba_Priv_Audit_Opts, Dba_Stmt_Audit_Opts

Auditing Via Trigger

It is possible to audit the system by using triggers, there are a number of system-level triggers that can be fired such as database startup, logon, logoff, ddl, server error

Example Trigger Auditing:
create or replace trigger audit_insert after insert on vallep.employees for each row
insert into employees_table_audit
values (user, sysdate);
create or replace trigger logon_audit_trig
after logon on database
begin
insert into logon_audit values (user, sys_context('userenv', 'sessionid'), sysdate, null,
sys_context('userenv', 'host'));end;

Fine-Grain Auditing

Fine-grain auditing (FGA) allows you to audit users accessing data of a certain criteria. As per standard auditing you can audit select, insert, update and delete operations. You use the package dbms_fga to add, remove, enable and disable FGA auditing policies, it is virtually impossible to bypass these policies, one nice feature is that you can attach handlers (like a trigger) to the policies which can execute procedures which could email or page you. There are many options that can be applied to the dbms_fga package, so best to look up the oracle man pages but here are some simple example

Privilege: grant execute on dbms_fga to vallep;

Creating Auditing:
dbms_fga.add_policy (object_schema => 'vallep',
object_name => 'employees',policy_name => 'compensation_aud',

audit_columns => 'salary,commission_pct',
enable => false, statement_types => 'select');

Creating (handler):
dbms_fga.add_policy (object_schema => 'vallep',
object_name => 'employees',policy_name => 'compensation_aud',
audit_columns => 'salary,commission_pct',
enable => false,statement_types => 'select'
handler_schema => 'vallep'
handler_module => 'log_id');
create procedure vallep.log_id (schema1 varchar2, table1 varchar2, policy1
varchar2) as
beginutil_alert_pager(schema1, table1, policy1);/* send an alert via a pager */ end;

Removing auditing:
dbms_fga.drop_policy (object_schema => 'vallep',
object_name => 'employees', policy_name => 'compensation_aud');
Enabling auditing:
dbms_fga.enable_policy (object_schema => 'vallep',
object_name => 'employees',
policy_name => 'compensation_aud');

Disabling auditing:

dbms_fga.edisable_policy ( object_schema => 'vallep',object_name => 'employees', policy_name => 'compensation_aud');

Usful Tables:

DBA_AUDIT_POLICIES, DBA_FGA_AUDIT_TRAIL, DBA_COMMON_AUDIT_TRAIL

Maintenance

The audit trail must be deleted/archived on a regular basis to prevent the SYS.AUD$ table growing to an unacceptable size
Security
Only DBAs should have maintenance access to the audit trail. If SELECT access is required by any applications this can be granted to any users, or alternatively a specific user may be created for this. Auditing modifications of the data in the audit trail itself can be achieved as follows:
AUDIT INSERT, UPDATE, DELETE ON sys.aud$ BY ACCESS;


init parameters
Until Oracle 10g, auditing is disabled by default, but can be enabled by setting the AUDIT_TRAIL static parameter in the init.ora file.


From Oracle 11g, auditing is enabled for some system level privileges.

SQL> show parameter audit
NAMETYPEVALUE
-----------------------------------------------
audit_file_deststring?/rdbms/audit
audit_sys_operationsbooleanFALSE
audit_trailstringNONE
transaction_auditingbooleanTRUE

AUDIT_TRAIL can have the following values.
AUDIT_TRAIL={NONE or FALSE| OS| DB or TRUE| DB_EXTENDED| XML |XML_EXTENDED}

The following list provides a description of each value:
  • NONE or FALSE -> Auditing is disabled. Default until Oracle 10g.
  • DB or TRUE -> Auditing is enabled, with all audit records stored in the database audit trial (AUD$). Default from Oracle 11g.
  • DB_EXTENDED –> Same as DB, but the SQL_BIND and SQL_TEXT columns are also populated.
  • XML-> Auditing is enabled, with all audit records stored as XML format OS files.
  • XML_EXTENDED –> Same as XML, but the SQL_BIND and SQL_TEXT columns are also populated.
  • OS -> Auditing is enabled, with all audit records directed to the operating system's file specified by AUDIT_FILE_DEST.
Note: In Oracle 10g Release 1, DB_EXTENDED was used in place of "DB,EXTENDED". The XML options were brought in Oracle 10g Release 2.

The AUDIT_FILE_DEST parameter specifies the OS directory used for the audit trail when the OS, XML and XML_EXTENDED options are used. It is also the location for all mandatory auditing specified by the AUDIT_SYS_OPERATIONS parameter.

The AUDIT_SYS_OPERATIONS static parameter enables or disables the auditing of operations issued by users connecting with SYSDBA or SYSOPER privileges, including the SYS user. All audit records are written to the OS audit trail.

Run the $ORACLE_HOME/rdbms/admin/cataudit.sql script while connected as SYS (no need to run this, if you ran catalog.sql at the time of database creation).

Start Auditing
Syntax of audit command:
audit {statement_option|privilege_option} [by user] [by
{session|access}] [whenever {successful|not successful}]

Only the statement_option or privilege_option part is mandatory. The other clauses are optional and enabling them allows audit be more specific.

There are three levels that can be audited:

Statement level
Auditing will be done at statement level.
Statements that can be audited are found in STMT_AUDIT_OPTION_MAP.
SQL> audit table by scott;

Audit records can be found in DBA_STMT_AUDIT_OPTS.
SQL> select * from DBA_STMT_AUDIT_OPTS;

Object level
Auditing will be done at object level.
These objects can be audited: tables, views, sequences, packages, stored procedures and stored functions.
SQL> audit insert, update, delete on scott.emp by hr;

Audit records can be found in DBA_OBJ_AUDIT_OPTS.
SQL> select * from DBA_OBJ_AUDIT_OPTS;

Privilege level
Auditing will be done at privilege level.
All system privileges that are found in SYSTEM_PRIVILEGE_MAP can be audited.
SQL> audit create tablespace, alter tablespace by all;

Specify ALL PRIVILEGES to audit all system privileges.

Audit records can be found in DBA_PRIV_AUDIT_OPTS.
SQL> select * from DBA_PRIV_AUDIT_OPTS;

Audit options
BY SESSION
Specify BY SESSION if you want Oracle to write a single record for all SQL statements of the same type issued and operations of the same type executed on the same schema objects in the same session.

Oracle database can write to an operating system audit file but cannot read it to detect whether an entry has already been written for a particular operation. Therefore, if you are using an operating system file for the audit trail (that is, the AUDIT_TRAIL initialization parameter is set to OS), then the database may write multiple records to the audit trail file even if you specify BY SESSION.
SQL> audit create, alter, drop on currency by xe by session;
SQL> audit alter materialized view by session;

BY ACCESS 
Specify BY ACCESS if you want Oracle database to write one record for each audited statement and operation.

If you specify statement options or system privileges that audit data definition language (DDL) statements, then the database automatically audits by access regardless of whether you specify the BY SESSION clause or BY ACCESS clause.

For statement options and system privileges that audit SQL statements other than DDL, you can specify either BY SESSION or BY ACCESS. BY SESSION is the default.
SQL> audit update on health by access;
SQL> audit alter sequence by tester by access;

WHENEVER [NOT] SUCCESSFUL 
Specify WHENEVER SUCCESSFUL to audit only SQL statements and operations that succeed.
Specify WHENEVER NOT SUCCESSFUL to audit only SQL statements and operations that fail or result in errors.

If you omit this clause, then Oracle Database performs the audit regardless of success or failure.
SQL> audit insert, update, delete on hr.emp by hr by session whenever not successful;
SQL> audit materialized view by pingme by access whenever successful;

Examples
Auditing for every SQL statement related to roles (create, alter, drop or set a role).
SQL> AUDIT ROLE;

Auditing for every statement that reads files from database directory
SQL> AUDIT READ ON DIRECTORY ext_dir;

Auditing for every statement that performs any operation on the sequence
SQL> AUDIT ALL ON hr.emp_seq;

View Audit Trail
The audit trail is stored in the base table SYS.AUD$.
It's contents can be viewed in the following views:
· DBA_AUDIT_TRAIL
· DBA_OBJ_AUDIT_OPTS
· DBA_PRIV_AUDIT_OPTS
· DBA_STMT_AUDIT_OPTS
· DBA_AUDIT_EXISTS
· DBA_AUDIT_OBJECT
· DBA_AUDIT_SESSION
· DBA_AUDIT_STATEMENT
· AUDIT_ACTIONS
· DBA_AUDIT_POLICIES
· DBA_AUDIT_POLICY_COLUMNS
· DBA_COMMON_AUDIT_TRAIL
· DBA_FGA_AUDIT_TRAIL (FGA_LOG$)
· DBA_REPAUDIT_ATTRIBUTE
· DBA_REPAUDIT_COLUMN

The audit trail contains lots of data, but the following are most likely to be of interest:
Username - Oracle Username.
Terminal - Machine that the user performed the action from.
Timestamp - When the action occurred.
Object Owner - The owner of the object that was interacted with.
Object Name - name of the object that was interacted with.
Action Name - The action that occurred against the object (INSERT, UPDATE, DELETE, SELECT, EXECUTE)
Fine Grained Auditing (FGA), introduced in Oracle9i, allowed recording of row-level changes along with SCN numbers to reconstruct the old data, but they work for select statements only, not for DML such as update, insert, and delete.
From Oracle 10g, FGA supports DML statements in addition to selects.

Several fields have been added to both the standard and fine-grained audit trails:
  • EXTENDED_TIMESTAMP - A more precise value than the existing TIMESTAMP column.
  • PROXY_SESSIONID - Proxy session serial number when an enterprise user is logging in via the proxy method.
  • GLOBAL_UID - Global Universal Identifier for an enterprise user.
  • INSTANCE_NUMBER - The INSTANCE_NUMBER value from the actioning instance.
  • OS_PROCESS - Operating system process id for the oracle process.
  • TRANSACTIONID - Transaction identifier for the audited transaction. This column can be used to join to the XID column on the FLASHBACK_TRANSACTION_QUERY view.
  • SCN - System change number of the query. This column can be used in flashback queries.
  • SQL_BIND - The values of any bind variables if any.
  • SQL_TEXT - The SQL statement that initiated the audit action.
    The SQL_BIND and SQL_TEXT columns are only populated when the AUDIT_TRAIL=DB_EXTENDED or AUDIT_TRAIL=XML_EXTENDED initialization parameter is set.
Maintenance
The audit trail must be deleted/archived on a regular basis to prevent the SYS.AUD$ table growing to an unacceptable size.

Only users who have been granted specific access to SYS.AUD$ can access the table to select, alter or delete from it. This is usually just the user SYS or any user who has had permissions. There are two specific roles that allow access to SYS.AUD$ for select and delete, these are DELETE_CATALOG_ROLE and SELECT_CATALOG_ROLE. These roles should not be granted to general users.

Auditing modifications of the data in the audit trail itself can be achieved as follows
SQL> AUDIT INSERT, UPDATE, DELETE ON sys.aud$ BY ACCESS;

To delete all audit records from the audit trail:
SQL> DELETE FROM sys.aud$;

From Oracle 11g R2, we can change audit table's (SYS.AUD$ and SYS.FGA_LOG$) tablespace and we can periodically delete the audit trail records using DBMS_AUDIT_MGMT package.

Disabling Auditing
The NOAUDIT statement turns off the various audit options of Oracle. Use it to reset statement, privilege and object audit options. A NOAUDIT statement that sets statement and privilege audit options can include the BY USER option to specify a list of users to limit the scope of the statement and privilege audit options.

SQL> NOAUDIT;
SQL> NOAUDIT session;
SQL> NOAUDIT session BY scott, hr;
SQL> NOAUDIT DELETE ON emp;
SQL> NOAUDIT SELECT TABLE, INSERT TABLE, DELETE TABLE, EXECUTE PROCEDURE;
SQL> NOAUDIT ALL;
SQL> NOAUDIT ALL PRIVILEGES;
SQL> NOAUDIT ALL ON DEFAULT;

Oracle DBA Day Today Activities

How to Increase the size of a tablespace
Answer: There are 2 ways to increase the size of tablespace.

1. Add an Extra Data file to the tablespace

alter tablespace users add datafile '/u01/oradata/orcl/users02.dbf' size 25m;

2. Resize the Datafile that is currently supporting the tablespace. Some versions of Oracle does not like this, and brings the instance down, so do not use this unless you are really sure.

alter database datafile '/u01/oradata/orcl/users01.dbf' resize 50M;

Tuesday, 19 June 2012

Oracle 10 New Features

There are many features in the Oracle 10g which got introduced for the first time in the RDBMS. These features not only made the DBA's life easy but also gave the DBAs time to work on the important tasks instead of spending time in analysing the database memory, storage, file system, etc. I will go through every new feature in details in coming few days, but to begin with I will list here a brief description of all the latest features.

Oracle Database 10g has a long list of impressive architecture enhancements over its previous versions. Oracle has made this database very sophisticated and powerful, and has automated many of the traditional and mundane administrative functions. Oracle has tried to automate as much database functionality as possible and made it more scalable. Several changes have been made to improve memory structures, resource management, storage handling, SQL tuning, data movement, recovery speed, and globalization. This chapter will go over the most notable revisions to the database architecture for releases 1 and 2 of the Oracle Database 10g and any significant improvements for Release 2 is specifically mentioned in this and all chapters.

SYSAUX Tablespace
The SYSAUX tablespace is an auxiliary tablespace that provides storage for all non sys-related tables and indexes that would have been placed in the SYSTEM tablespace. SYSAUX is required for all Oracle Database 10g installations and should be created along with new installs or upgrades. Many database components use SYSAUX as their default tablespace to store data. The SYSAUX tablespace also reduces the number of tablespaces created by default in the seed database and user-defined database.

Rename Tablespace Option
Oracle Database 10g has implemented the provision to rename tablespaces. To accomplish this in older versions, you had to create a new tablespace, copy the contents from the old tablespace to the new tablespace, and drop the old tablespace. The Rename Tablespace feature enables simplified processing of tablespace migrations within a database and ease of transporting a tablespace between two databases.

Automatic Storage Management
Automatic Storage Management (ASM) is a new database feature for efficient management of storage with round-the-clock availability. It helps prevent the DBA from managing thousands of database files across multiple database instances by using disk groups. These disk groups are comprised of disks and resident files on the disks. ASM does not eliminate any existing database functionalities with file systems or raw devices, or Oracle Managed Files (OMFs). ASM also supports RAC configurations.

Temporary Tablespace Group
A temporary tablespace is used by the database for storing temporary data, which is not accounted for in recovery operations. A temporary tablespace group (TTG) is a group of temporary tablespaces. A TTG contains at least one temporary tablespace, with a different name from the tablespace. Multiple temporary tablespaces can be specified at the database level and used in different sessions at the same time.

In Oracle Database 10g, each database user will have a permanent tablespace for storing permanent data and a temporary tablespace for storing temporary data. In previous versions of Oracle, if a user was created without specifying a default tablespace, SYSTEM tablespace would have become the default tablespace. For Oracle Database 10g, a default permanent tablespace can be defined to be used for all new users without a specific permanent tablespace.

BigFile Tablespace
Gone are those days of tablespaces in the range of a few megabytes. These days, database tables hold a lot of data and are always hungry for storage. To address this craving, Oracle has come up with the Bigfile tablespace concept. A BigFile tablespace (BFT) is a tablespace containing a single, very large data file. With the new addressing scheme in 10g, four billion blocks are permitted in a single data file and file sizes can be from 8TB to 128TB, depending on the block size. To differentiate a regular tablespace from a BFT, a regular tablespace is called a small file tablespace. Oracle Database 10g can be a mixture of small file and BigFile tablespaces.

BFTs are supported only for locally managed tablespaces with ASM segments and locally managed undo and temporary tablespaces. When BFTs are used with Oracle Managed Files, data files become completely transparent to the DBA and no reference is needed for them. BFT makes a tablespace logically equivalent to data files (allowing tablespace operations) of earlier releases.

Prior to Oracle Database 10g, K and M were used to specify data file sizes. Because the newer version introduces larger file sizes up to 128TB using BFTs, the sizes can be specified using G and T for gigabytes and terabytes, respectively. For using BFT, the underlying operating system should support Large Files. In other words the file system should have Large File Support (LFS).

Cross-Platform Transportable Tablespaces
In Oracle 8i database, the transportable tablespace feature enabled a tablespace to be moved across different Oracle databases using the same operating system. Oracle Database 10g has significantly improved this functionality to permit the movement of data across different platforms. This will help transportable tablespaces to move data from one environment to another on selected heterogeneous platforms (operating systems). Using cross-platform transportable tablespaces, a database can be migrated from one platform to another by rebuilding the database catalog and transporting the user tablespaces. By default, the converted files are placed in the flash recovery area (also new to Oracle Database 10g), which is discussed later in this chapter. A list of fully supported platforms can be found in v$transportable_platform.

Performance Management Using AWR
Automatic Workload Repository (AWR) is the most important feature among the new Oracle Database 10g manageability infrastructure components. AWR provides the background services to collect, maintain, and utilize the statistics for problem detection and self-tuning. The AWR collects system-performance data at frequent intervals (generally 60 minutes) and stores them as historical system workload information for analysis. These metrics are stored in the memory for performance reasons. These statistics are regularly written from memory to disk by a new background process called Memory Monitor (MMON). This data will later be used for analysis of performance problems that occurred in a certain time period and to do trend analysis. Oracle does all this without any DBA intervention. Automatic Database Diagnostic Monitor (ADDM), which is discussed in the next section, analyzes the information collected by the AWR for database-performance problems.

Automatic Database Diagnostic Monitor (ADDM)
Automatic Database Diagnostic Monitor (ADDM) is the best resource for database tuning. Introduced in 10g, ADDM provides proactive and reactive monitoring instead of the tedious tuning process found in earlier Oracle versions. Proactive monitoring is done by ADDM and Server Generated Alerts (SGAs). Reactive monitoring is done by the DBA, who does manual tuning through Oracle Enterprise Manager or SQL scripts.

Statistical information captured from SGAs is stored inside the workload repository in the form of snapshots every 60 minutes. These detailed snapshots (similar to STATSPACK snapshots) are then written to disk. The ADDM initiates the MMON process to automatically run on every database instance and proactively find problems.

DROP DATABASE Command
Oracle Database 10g has introduced a means to drop the entire database with a single command: DROP DATABASE. The DROP DATABASE command deletes all database files, online log files, control files, and the server parameter (spfile) file. The archive logs and backups, however, have to be deleted manually.

Data Pump Utilities
Data Pump is the new high-speed infrastructure for data and metadata movement in Oracle Database 10g. The Data Pump commands are similar to the traditional export and import commands, but they are different products. Data Pump provides a substantiale performance improvement over the original export and import utilities. It also provides faster data load and unload capability to existing tables. Using Data Pump, platform-independent flat files can be moved between multiple servers. You can use the new network mode to transfer data using database links.

Export and import operations in Data Pump can detach from a long-running job and reattach to it later with out affecting the job. You can also remap data during export and import processes. The names of data files, schema names, and tablespaces from the source can be altered to different names on the target system. It also supports fine-grained object selection using the EXCLUDE, INCLUDE, and CONTENT parameters.

Data Pump Export (dpexp) is the utility for unloading data and metadata from the source database to a set of operating system files (dump file sets). Data Pump Import (dpimp) is used to load data and metadata stored in these export dump file sets to a target database.

In Oracle Database 10g Release 2, a default DATA_PUMP_DIR directory object and additional DBMS_DATAPUMP API calls have been added, along with provisions for compression of metadata in dump files, and the capability to control the dump file size with the FILESIZE parameter.

This section has reviewed the significant new features introduced in Oracle Database 10g. I will touch over the new processes introduced in Oracle Database 10g to support these features.

Wednesday, 6 June 2012

Hot Backup - User Managed

SQL> SELECT LOG_MODE FROM V$DATABASE;
LOG_MODE
------------
ARCHIVELOG

If you see ARCHIVELOG then you can proceed further. In order to take backup while you are in noarhivelog mode follow other post on my blog.

2)Determine the files that you need to take backup.

Whenever you decide to take your database backup then take backup of data files , online redo log files ,control files, spfile.

In order to decide which files you need to backup issue the following query.

SQL>SELECT NAME "File Need Backup" FROM V$DATAFILE
UNION ALL
SELECT MEMBER FROM V$LOGFILE
UNION ALL
SELECT NAME FROM V$CONTROLFILE
UNION ALL
SELECT VALUE FROM V$PARAMETER WHERE NAME='spfile';


File Need Backup
--------------------------------------------------------------------------------
/oradata2/data1/dbase/system01.dbf
/oradata2/data1/dbase/undotbs01.dbf
/oradata2/data1/dbase/sysaux01.dbf
/oradata2/data1/dbase/users01.dbf
/oradata2/data.dbf
/oradata2/data1/data02.dbf
/oradata2/6.dbf
/oradata2/DBASE/datafile/o1_mf_permanen_42l31vg0_.dbf
/oradata2/data_test.dbf
/oradata2/data1/dbase/redo03.log
/oradata2/data1/dbase/redo02.log
/oradata2/data1/dbase/redo01.log
/oracle/app/oracle/product/10.2.0/db_1/dbs/cntrldupbase.dbf
/oracle/app/oracle/product/10.2.0/db_1/dbs/spfiledupbase.ora
13 rows selected.

So after running the above query I can say I need to backup 13 files.

3)Take the tablespace in backup mode rather than offline and read-only tablespace. In case of offline and read only tablespace you do not have to place the tablespace in backup mode because the database is not permitting changes to the datafiles.

You can check the status, tablespace_name and it's associated data file name with the following query,

SELECT t.STATUS,t.TABLESPACE_NAME "Tablespace", f.FILE_NAME "Datafile"
FROM DBA_TABLESPACES t, DBA_DATA_FILES f
WHERE t.TABLESPACE_NAME = f.TABLESPACE_NAME;
ORDER BY t.NAME;


Take the tablespace in backup mode rather than offline and read-only tablespace.

You can easily make a script of taking the online tablespace in backup mode by following query.

SQL>SELECT 'ALTER TABLESPACE ' ||TABLESPACE_NAME ||' BEGIN BACKUP;' "Script" FROM DBA_TABLESPACES WHERE STATUS NOT IN ('READ ONLY','OFFLINE');

Script
-------------------------------------------------------------
ALTER TABLESPACE SYSTEM BEGIN BACKUP;
ALTER TABLESPACE UNDOTBS1 BEGIN BACKUP;
ALTER TABLESPACE SYSAUX BEGIN BACKUP;
ALTER TABLESPACE TEMP BEGIN BACKUP;
ALTER TABLESPACE USERS BEGIN BACKUP;
ALTER TABLESPACE TEMP_T BEGIN BACKUP;

6 rows selected.

Alternatively, you can issue

SQL>ALTER DATABASE BEGIN BACKUP;


4)Copy the datafile to backup location.

After making a tablespace in backup mode take backup/copy of the associated datafiles. Here you can also make a script in order to copy datafiles to another location.

For online tablespace you must at first take it backup mode. You can check whether backup mode now active or not by issuing following query,

SQL>SELECT t.name AS "TB_NAME", d.file# as "DF#", d.name AS "DF_NAME", b.status
FROM V$DATAFILE d, V$TABLESPACE t, V$BACKUP b
WHERE d.TS#=t.TS#
AND b.FILE#=d.FILE#
AND b.STATUS='ACTIVE';

SQL> SELECT 'host scp '|| FILE_NAME || ' &backup_location ' "Backup Command" FROM DBA_DATA_FILES;
Enter value for backup_location: /backup

old 1: SELECT 'host scp '|| FILE_NAME || ' &backup_location ' "Backup Command" FROM DBA_DATA_FILES
new 1: SELECT 'host scp '|| FILE_NAME || ' /backup ' "Backup Command" FROM DBA_DATA_FILES

Backup Command
------------------------------------------------------------------------------------------
host scp /oradata2/data1/dbase/system01.dbf /backup
host scp /oradata2/data1/dbase/undotbs01.dbf /backup
host scp /oradata2/data1/dbase/sysaux01.dbf /backup
host scp /oradata2/data1/dbase/users01.dbf /backup
host scp /oradata2/data.dbf /backup
host scp /oradata2/data1/data02.dbf /backup
host scp /oradata2/6.dbf /backup
host scp /oradata2/DBASE/datafile/o1_mf_permanen_42l31vg0_.dbf /backup
host scp /oradata2/data_test.dbf /backup

9 rows selected.

Also you can backup network files. Do a recursive search for *.ora starting in your Oracle home directory and under it.

In order to make script for to copy data files for those tablespace which are only in backup mode then issue,

SQL>SELECT 'host scp '|| d.name ||' &backup_location' FROM V$DATAFILE d, V$TABLESPACE t, V$BACKUP b
WHERE d.TS#=t.TS#
AND b.FILE#=d.FILE#
AND b.STATUS='ACTIVE';


Run the script that you genereted.

On windows or other operating system you can use graphical browser to copy or other associated copy command.

5)Whenever you copy is finished make the tablespace out of backup mode. You can issue BEGIN BACKUP .. SCP serially (Take one tablespace in begin backup mode and then copy the associated datafiles and make the tablespace out of backup mode) or you can do it parallely(Take all tablespaces in begin backup mode and then copy the associated datafiles of all tabelspaces and then make the tablespace out of backup mode).

You here also make a script like,

SQL>SELECT 'ALTER TABLESPACE ' ||t.name ||' END BACKUP;' "End Backup Script"
FROM V$DATAFILE d, V$TABLESPACE t, V$BACKUP b
WHERE d.TS#=t.TS#
AND b.FILE#=d.FILE#
AND b.STATUS='ACTIVE';

End Backup Script
----------------------------------------------------------
ALTER TABLESPACE SYSTEM END BACKUP;

You if you have taken Database in backup mode then issue

SQL>ALTER DATABASE END BACKUP;